I recently read a blog post about whether or not to finish a novel you have started and don't like. My opinion on this subject has always been pretty simple and straightforward: Why waste my time finishing a book I am not enjoying when there are so many good books out there for me to be reading? And...more importantly, if the author can't make a good beginning, why will the ending be any good? Or on the flip side, if you do write an incredible ending why couldn't you make the beginning worth slogging through? Normally, I give a book a couple chapters at most to decide if I like it and am going to finish it. If it doesn't grab me, I quit reading and try something different. I have found that it's not always the book's fault. Some days it depends on the "reading mood" I am in. I might be mentally tired of reading a certain type of book and if I start this same novel again in a few months, I may love one that I have previously found boring and quit. There has been one book that took me until page 63 and 3 different times of taking it home and trying again to finish it. I only stuck with it that long because so many people told me I needed to read this particular book. Granted, when I finally made it past page 63, I ended up liking it and going on to finish the trilogy. I do still wonder, though, why, if I ended up enjoying the book, did I hate the beginning in the first place?
Back to the blog, I recently read. This blog cited an article in The Atlantic about whether or not one should finish a novel they have begun. After having read this article, I can see another side to the whole issue of finishing or not finishing a novel you've at once begun. Perhaps, there is something to be said for being a tenacious reader. What do you think? Is it better to finish something you've started, or move on to something bigger and better. Check out the article and let me know what you think!
Happy Reading in 2015!
Tuesday, December 30, 2014
Monday, December 29, 2014
A Challenge perhaps?
In flipping through facebook, I ran across this list of 10 best books of 2014. It's always intriguing to me what gets rated as "the best" books and then, how many of them have I actually read. Take a look and see how you compare. Perhaps challenge yourself to read some or all of "The Best Books of 2014."
http://www.nytimes.com/2014/12/14/books/review/the-10-best-books-of-2014.html?_r=0
http://www.nytimes.com/2014/12/14/books/review/the-10-best-books-of-2014.html?_r=0
Friday, December 26, 2014
From Our Recipe Box to Yours...
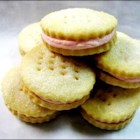
One of my favorite all-time Christmas cookies...They take a fair amount of work, but are totally worth it!!!
Cream Wafers
|
 |
Submitted By: FARMLIFE
Photo By: SUGARPLUMSCOOKIES
|
"Cookies with a creamy butter filling."
INGREDIENTS:
1 cup butter
1/3 cup heavy cream
2 cups all-purpose flour
1/3 cup granulated sugar for decoration
|
1/4 cup butter, softened
3/4 cup sifted confectioners' sugar
1 egg yolk
1 teaspoon vanilla extract
|
DIRECTIONS:
| 1. | Mix flour and 1 cup of butter or margarine thoroughly. Stir in whipping cream and mix well. Chill 1 hour. |
| 2. | Preheat oven to 375 degrees F (190 degrees C). |
| 3. | Roll dough 1/8 inch thick on lightly floured board. Cut into 1 1/2 inch rounds. Transfer to waxed paper heavily sprinkled with sugar, turning to coat both sides. Place on un- greased baking sheet. Prick in 4 places with fork. Bake 7 to 9 minutes or until slightly puffed. Put two cooled cookies together with filling. |
| 4. | To Make Filling: Blend 1/4 cup soft butter, 3/4 cup sifted confectioners' sugar, 1 egg yolk, and 1 tsp. vanilla. If desired, tint with food coloring. |
| ALL RIGHTS RESERVED © 2014 Allrecipes.com | Printed from Allrecipes.com 12/26/2014 |
Tuesday, December 23, 2014
Suggested Holiday Reading....
Here is a holiday reading bookmark for you!! They are also available in the library to give you some fun holiday titles to choose from!!
Enjoy the holidays and Enjoy your reading!!!

Enjoy the holidays and Enjoy your reading!!!
Friday, December 19, 2014
From Our Recipe Box to Yours...
This Holiday season has been extremely busy for me and I haven't had any chance to make goodies to share or just to eat. My youngest son needed treats for school, so we made these for him to take...Fun, easy, and yummy!
Christmas Dessert: Snowmen
(https://www.bloglovin.com/blog/post/11299781/2026309079?link=aHR0cCUzQSUyRiUyRmZlZWRwcm94eS5nb29nbGUuY29tJTJGJTdFciUyRmxpZmVzdHlsZXdpdGhkYW5ueSUyRiU3RTMlMkZWNlJ0aC0xQjlMdyUyRnBvc3RyZS1uYXZpZGVuby1ob21icmUtZGUtbmlldmUuaHRtbA==)
Christmas Dessert: Snowmen
(https://www.bloglovin.com/blog/post/11299781/2026309079?link=aHR0cCUzQSUyRiUyRmZlZWRwcm94eS5nb29nbGUuY29tJTJGJTdFciUyRmxpZmVzdHlsZXdpdGhkYW5ueSUyRiU3RTMlMkZWNlJ0aC0xQjlMdyUyRnBvc3RyZS1uYXZpZGVuby1ob21icmUtZGUtbmlldmUuaHRtbA==)
Put the sticks into the oreos, then splits into pieces the white chocolate and melt it for 5 min, whisk for 3 minutes to remove any lumps and putting it liquid. When the chocolate is liquid, cover the oreo with the white chocolate, put the oreo with chocolate on the wax paper. Tic Tac for nose and black gel icing for eyes and mouth.
 |
Ours, may or may not have looked like this....could have been more of a Pinterest Fail, but they tasted good and we had fun doing them!!
Monday, December 15, 2014
Book Trailer Monday...
In all the stress of the holidays, I needed a laugh! Here's what I am reading....
Friday, December 12, 2014
From Our Recipe Box to Yours....Christmas Goodies!
Christmas is fast approaching and I don't know about you, but I am a bit behind. There are sooo many candy recipes I'd like to try, but not enough time in the month!:) Here's one that is super easy and super yummy; a great addition to your traditional treats! I found the recipe here: http://momsneedtoknow.com/oreo-truffles-recipe/
Oreo Truffles
1 - 15 oz. pkg. Oreos (chocolate sandwich cookies of your choice)
1- 8 oz. pkg. cream cheese, softened
1 pkg. white chocolate chips or candy melts (you can also use dark chocolate chips - I like using both!)
Directions:
1. Finely crush the Oreos. This can easily be done in your food processor. Otherwise, you can place the cookies in a plastic bag and use a rolling pin.
2. Reserve about 1 1/2 T. crushed cookies. You will use these later for garnish.
3. Mix cream cheese together with the Oreos. Mix until completely combined.
4. Line a cookie sheet with parchment paper. Shape the cookie mixture into about 40 balls and place on lined cookie sheet.
5. Place cookie sheet in the refrigerator for about an hour, or the freezer for 20 minutes. This will help make the cookie balls firm which will make it easier to coat them.
6. Melt the white chocolate in the microwave, stirring every 30 seconds until melted.
7. Working quickly coat cookie balls with white chocolate. Use 2 forks to help ensure they get coated well.
8. Place coated Oreo Truffles back on the parchment paper and sprinkle with reserved crushed cookie crumbs.
9. Return truffles to the refrigerator for 10 minutes to allow the chocolate to completely firm up.
If you happen to have any left at all, store in an airtight container!!! Enjoy!!!
Monday, December 1, 2014
Book Trailer Monday...
This book trailer is a real tease. I actually did just finish reading The Young Elites by Marie Lu, the same author of The Legend series, and it really is all that!! I loved it and cannot wait for the next installment as is always the case with new writers and series. But it is definitely worth a check out!
Monday, November 24, 2014
From Our Recipe Box to Yours....
I ran across this recipe today and I thought, "What a perfect breakfast for Thanksgiving!!" I thought I'd share and give you all one more thing to make and love this time of the year!!!


The delicate pumpkin flavor of these muffins is enhanced with tart, juicy cranberries. I sometimes dust the tops with powdered sugar for added sweetness. —Sue Ross, Casa Grande, Arizona
Read more: http://www.tasteofhome.com/recipes/cranberry-pumpkin-muffins#ixzz3K0fz5CSj
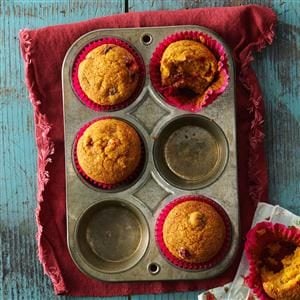
Cranberry Pumpkin Muffins
The delicate pumpkin flavor of these muffins is enhanced with tart, juicy cranberries. I sometimes dust the tops with powdered sugar for added sweetness. —Sue Ross, Casa Grande, Arizona
24 ServingsPrep/Total Time: 30 min.
Ingredients
- 2-1/4 cups all-purpose flour
- 1 teaspoon baking soda
- 1 teaspoon pumpkin pie spice
- 1/2 teaspoon salt
- 2 eggs
- 2 cups sugar
- 1 cup canned pumpkin
- 1/2 cup canola oil
- 1 cup fresh or frozen cranberries, chopped
Directions
- In a bowl, combine the first four ingredients. In a bowl, beat the
- eggs and sugar; add the pumpkin and oil and mix well. Stir into the
- dry ingredients just until moistened. Fold in the cranberries.
- Fill foil-or paper-lined muffin cups three-fourths full. Bake at
- 400° for 18-22 minutes or until a toothpick comes out clean.
- Cool for 5 minutes before removing from pans to wire racks. Yield: 2
- dozen.
Nutritional Facts: 1 serving (1 each) equals 159 calories, 5 g fat (1 g saturated fat), 18 mg cholesterol, 108 mg sodium, 27 g carbohydrate, 1 g fiber, 2 g protein.
Read more: http://www.tasteofhome.com/recipes/cranberry-pumpkin-muffins#ixzz3K0fz5CSj
Friday, November 14, 2014
From Our Recipe Box to Yours...
I know I already posted a recipe today...I know this is not Thanksgiving related....but....these cinnamon rolls look absolutely amazing!!!
The Farmer's Wife, a blog I recently found put these up last year, but mmmmmmm...Can't wait to try them!!
Caramel Cinnamon Rolls

The Farmer's Wife, a blog I recently found put these up last year, but mmmmmmm...Can't wait to try them!!
Caramel Cinnamon Rolls

You will need:
2 loaves of frozen bread dough {YEP, I cheated}
Cinnamon
3 Sticks of Butter {hope you are not worried about your diet}
Brown Sugar
White Sugar
Vanilla Ice Cream
Thaw your bread according to the package directions. With a rolling pin, roll the dough out about 1/4 of an inch thick in an oval shape on a floured surface. I use 2 loaves so I do all of these steps twice or in twos...make sense. Take one stick of softened butter and smear over the dough {using half on each loaf}. Sprinkle cinnamon over the top of the butter {about 2 TBSP per loaf}. Then lightly sprinkle some brown sugar over the cinnamon. You will probably use about 1/2 cup of brown sugar per loaf. Roll the dough up so you have a long tube. Cut the rolls so they are about 3/4 of an inch thick. You should get 12 rolls per loaf. Transfer the rolls to a greased 9x13 pan {so 2 pans}.
For the gooey goodness....
In a sauce pan, melt 2 sticks of butter and 1 to 1 1/2 cups of ice cream. Add 1 cup each of brown sugar and white sugar. Bring to a boil for 1 minute. Pour mixture evenly over the 2 pans of cinnamon rolls. Allow the rolls to rise at room temperature until they are almost double in size. I set mine on top of my stove while my oven preheats which helps them rise.
Preheat oven to 350. Bake for 25-30 minutes. When rolls are finished allow them to cool a few minutes then flip them out on a cookie sheet and allow to cool completely {ah, who am I kidding...allow them to cool until they won't burn your mouth}. ENJOY!!!
If you want to prepare these the evening before you can. Just don't let them rise at room temperature, but instead cover them with saran wrap sprayed with cooking spray and place in the refrigerator overnight. They will slowly rise overnight and will be ready to pop in the oven in the morning.
From Our Recipe Box to Yours...
What would Thanksgiving Dinner be with rolls? Not complete! That's what! But, you already make rolls, right? So, today, I'm not really including a recipe for the rolls, but an "idea" for your rolls found on
http://www.theidearoom.net/2010/11/thankful-rolls.html..
Here's a little sample, but go check it out for yourself....

Saturday, November 8, 2014
From Our Recipe Box to Yours...
I'm so excited it's the month of November!! Even if it doesn't feel like it should be here yet:). Thanksgiving dinner is one of my favorite meals of all time...Turkey...stuffing in the bird or not, love it all...mashed potatoes with gravy or not, love them both ways...green bean casserole...corn in a casserole or not...homemade rolls...and the salads and the pies!!!! I'm lucky Thanksgiving only comes once a year! So, in honor of that tradition, I'll share a few Thanksgiving recipes with you over the next few weeks...Maybe we'll find a new favorite to include every year!
Sweet Potatoes from www.thepioneerwoman.com
Prep: 45 mins Level: Easy
Cook: 30 mins Serves: 10
Description
If you think you don’t like sweet potatoes, please—in the name of all that is good, holy,
and fattening—give this a try. You’ll thank yourself!
Ingredients
4 whole Medium Sweet Potatoes
1 cup Sugar
1 cup Milk
2 whole Eggs
1 teaspoon Vanilla Extract
1 teaspoon Salt
1 cup Brown Sugar
1 cup Pecans
½ cups Flour
¾ sticks Butter
Preparation
Wash 4 medium sweet potatoes and bake them in a 375-degree oven until fork tender,
about 30-35 minutes. When they are finished cooking slice them open and scrape out
the flesh into a large bowl.
Add 1 cup of (regular grandulated) sugar, 1 cup of milk, 2 eggs, 1 teaspoon of vanilla
extract and 1 teaspoon of salt. With a potato masher, mash them up just enough—you
don’t want to be perfectly smooth.
Now, in a separate bowl, add 1 cup brown sugar, 1 cup pecans, chopped (that means
measure a cup of pecans, then chop them), ½ cup flour, and ¾ stick of butter. With a
pastry cutter or fork, mash together until thoroughly combined.
Spread the sweet potato mixture into a regular baking dish and sprinkle the crumb
mixture all over the top.
Bake in a 400-degree oven for 30 minutes, or until golden brown.
or how about this one?...
Whiskey-Glazed Carrots
Prep: 10 mins Level: Easy
Cook: 15 mins Serves: 8
Description
Oh, how I love Glazed Carrots—they’re so easy to make and yield such a delightful and
impressive result. Bright, colorful, and scrumptious, they’re equally appropriate for a
Tuesday evening dinner by yourself or for an elegant Thanksgiving or Christmas
Spread.
Ingredients
1 stick Butter, Divided
2 pounds (to 3 Pounds) Carrots, Peeled And Cut Into Thick Circles
½ cups Jack Daniels Or Other Whiskey
¾ cups (to 1 Cup) Brown Sugar
½ teaspoons (to 1 Teaspoon) Salt
Freshly Ground Pepper, to taste
Preparation
Melt 1 tablespoon butter in a large skillet over high heat. Add carrots in two batches,
cooking for 60-90 seconds each batch. Remove from skillet.
Pour in whiskey and allow to evaporate 30 seconds. Reduce heat to medium, and add
remaining butter. When butter melts, sprinkle brown sugar over the top. Stir together,
then add carrots to skillet. Cover, and continue cooking for 5 minutes.
Remove lid and add salt and pepper. Continue cooking until carrots are done and glaze
is thick, about 5 more minutes.
Pour onto a platter and serve immediately. Sprinkle with chopped chives if desired.
Stick a serving spoon in the mix, and it’s time to serve ‘em up. And oh, what a
wonderful time it is. I gobbled these up ‘til I embarrassed myself.
And you will, too. I know it.
Monday, November 3, 2014
A Book Trailer AND a recipe....
It's still Fall and Pumpkin is still where it's at even if we are quickly heading into the Christmas goody realm!! I love pumpkin and I love Snickerdoodles!! Why not combine them?! It's gotta be good, right? I found this combination on Sweat Pea's kitchen...http://sweetpeaskitchen.com/2011/09/pumpkin-snickerdoodles/print/
Pumpkin Snickerdoodles
This spin on the classic snickerdoodle are kicked up a notch with the addition of pumpkin puree and pumpkin pie spice. If you love regular snickerdoodles, you’ll flip for this delicious version!
Yield: 4 dozen
Cook Time: 12 minutes
Ingredients:
2 3/4 cups all-purpose flour
2 teaspoons cream of tartar
1 teaspoon baking soda
1/2 teaspoon salt
1/2 teaspoon pumpkin pie spice
1 3/4 cups sugar, divided
2 sticks unsalted butter, softened
1 large egg
3/4 cup pumpkin puree
2 tablespoons ground cinnamon
2 teaspoons cream of tartar
1 teaspoon baking soda
1/2 teaspoon salt
1/2 teaspoon pumpkin pie spice
1 3/4 cups sugar, divided
2 sticks unsalted butter, softened
1 large egg
3/4 cup pumpkin puree
2 tablespoons ground cinnamon
Directions:
Adjust the oven racks to the upper-and lower-middle positions and heat the oven to 400 degrees F. Line two baking sheets with parchment paper; set aside.
In a large bowl, whisk together flour, cream of tartar, baking soda, salt and pumpkin pie spice; set aside.
In the bowl of a stand mixer fitted with a paddle attachment, cream the butter and 1 1/2 cups sugar at medium speed until light and fluffy, about 2 minutes. Scrape down the sides of the bowl with a rubber spatula as needed. Add the egg and beat at medium speed until combined, about 30 seconds. Add the pumpkin puree and beat at medium speed until combined, about 30 seconds. Add the dry ingredients and beat at low speed until just combined, about 30 seconds, scraping down the bowl as needed.
Place the remaining 1/4 cup sugar and cinnamon for rolling in a shallow bowl. Roll a heaping tablespoon of dough into a 1½-inch ball, roll the ball in the sugar mixture, and place it on the prepared baking sheet. Repeat with the remaining dough, spacing the balls about 2 inches apart
Bake the cookies, one sheet at a time, until the edges are set and just beginning to brown but the centers are still soft and puffy, 10 to 12 minutes, rotating the baking sheet halfway through baking. Cool the cookies on the baking sheets about 5 minutes; using a wide metal spatula, transfer the cookies to a wire rack and cool to room temperature.
Recipe Notes:
The dough can be made through step 3 and either covered tightly with plastic wrap and refrigerated for up to 3 days or frozen.
To freeze the cookie dough, portion into individual balls, roll in the cinnamon and sugar, and freeze on a parchment- or wax-paper-lined plate (don't let them touch or they will fuse together) until completely firm, 2 to 3 hours. When ready to bake, reduce the oven temperature to 300 degrees and increase the baking time to 17 to 22 minutes.
Now for a book trailer....
Have you noticed that a lot of people on Facebook are challenging themselves to being thankful for 30 days? Gratitude breeds more gratitude and no one knows this better than author of 365 Thank Yous, John Krulik. Check out his journey and maybe start your own.
Saturday, October 25, 2014
A Saturday Recipe instead...
My middle son requested Sesame Chicken for supper, so I found this recipe on Pinterest and we tried it last night. http://therecipecritic.com/2013/09/baked-honey-sesame-chicken/
Baked Honey Sesame Chicken
AUTHOR: ALYSSA
PREP TIME:
COOK TIME:
TOTAL TIME:
SERVES: 6
INGREDIENTS
- 4 chicken breasts
- 1 cup cornstarch
- 3 eggs
- salt and pepper
- ¼ cup canola oil
- Sauce:
- ¾ cup honey
- ¾ cup soy sauce
- ½ cup ketchup
- ½ cup brown sugar
- ½ cup rice wine vinegar
- 1 t sesame oil
- 1 t minced garlic
- 1 T cornstarch
- additional sesame seeds for garnish
INSTRUCTIONS
- Preheat oven to 325 degrees. Cut chicken breasts into bite-sized pieces and season with salt and pepper.
- In separate bowls, place cornstarch and slightly beaten eggs. Dip chicken into cornstarch then coat in egg mixture. I have also found that you can put the chicken pieces in a gallon size bag and shake to coat.
- Heat canola oil in a large skillet over medium-high heat and cook chicken until browned. Place the chicken in a 9 x 13 greased baking dish.
- In a medium sized mixing bowl, combine honey, soy sauce, ketchup, brown sugar, rice wine vinegar, sesame oil, minced garlic, and 1 T cornstarch. Pour over chicken and bake for 45 minutes or until chicken is cooked through.
- I stirred the chicken every 15 minutes so that it coated them in the sauce.
Turned out really yummy!
Monday, October 20, 2014
Book Trailer Monday...
Liane Moriarty has become quite popular recently. Her Husband's Secret sparked a sensation and her newest novel Big Little Lies is well on it's way. Here Liane talks about her novel and writing inspiration.
Friday, October 17, 2014
From Our Recipe Box to Yours...
I've noticed lately that everyone I talk to has either just been to the apple orchards or they are going to go the next weekend...Apples, apples, apples!! What to do with them all?! I recently saw this recipe on a friend's board in Pinterest and thought they looked yummy! Found on http://www.thegunnysack.com/2014/09/bloomin-baked-apples-recipe.html
Another thing everyone tells me about going to the apple orchards is eating apple donuts....Since I might not make it to the orchards this year, I found this recipe to try...http://www.stylemepretty.com/living/2013/10/16/apple-cider-donuts/
Apple Cider Donuts
Ingredients
Bloomin’ Baked Apples Recipe
Ingredients
- 2 Honeycrisp apples (or other crisp apples)
- 2 tbsp butter
- 3 tbsp brown sugar, packed
- 1 tbsp flour
- 1 tsp cinnamon
- 4 caramels, unwrapped
- Optional toppings: vanilla ice cream, caramel sauce and cinnamon
Instructions
- Preheat the oven to 375 degrees.
- To get the blooming apple look, you need to cut the apples. Slice off the top 1/4 to 1/3 of the apples. Scoop out the core. I don’t have an apple corer so I used my metal 1/2 teaspoon measuring spoon. Then, use a thin knife to make two, deep circular cuts around the center of the apple. Next, turn the apple over and make narrow cuts all the way around the apple. Flip it back over and you can see all of the cuts.
- Place the apples in an oven safe dish and put two unwrapped caramels into the center of each apple.
- Heat butter and brown sugar in the microwave for 30 second, stir and continue heating for an additional 30 seconds. Remove from the microwave and stir in flour and cinnamon. Divide the mixture over the top of the two sliced apples.
- Bake at 375 for 25-30 minutes. Remove from the oven and use a large spoon to move the apples into bowls.
- Top with a scoop of ice cream, drizzle with caramel and sprinkle with cinnamon. The ice cream will cause the caramel in the center to harden so eat quickly or put the ice cream scoop on the side.
Another thing everyone tells me about going to the apple orchards is eating apple donuts....Since I might not make it to the orchards this year, I found this recipe to try...http://www.stylemepretty.com/living/2013/10/16/apple-cider-donuts/
Apple Cider Donuts
| PREP TIME 15 Minute/s | COOK TIME 10 Minute/s | TOTAL TIME 25 Minute/s |
- FOR THE DONUTS:
- 2 cups all-purpose flour
- 3/4 cup white sugar
- 2 tsp. baking powder
- ½ tsp apple pie spice
- 1 teaspoon salt
- ½ cup apple cider
- ¼ cup milk
- 2 eggs, beaten
- 1 tsp. vanilla extract
- 1 tbsp. butter, melted
- FOR THE CINNAMON SUGAR TOPPING:
- 1/4 cup white sugar
- 1/4 cup brown sugar
- 1 tbsp. cinnamon
- 2 tbsp. butter, melted
- FOR THE DONUTS:
- Preheat oven to 325 degrees F (165 degrees C).
- In a large bowl, mix flour, sugar, baking powder, apple pie spice & salt.
- Stir in cider, milk, eggs, vanilla and melted butter.
- Beat together until combined.
- In a lightly greased donut pan, fill each cup 3/4 full.
- Bake for 8-10 minutes until the donuts spring back when touched.
- Cool for 2-3 minutes, then remove from pan.
- FOR THE TOPPING:
- Meanwhile, mix together sugars and cinnamon until combined.
- Brush each warm donut with butter and toss in cinnamon sugar mixture.
- Enjoy while still warm!
Wednesday, October 15, 2014
What's In Your Library Bag Wednesday?
It's my favorite time of year!! It's fall AND Halloween time! I dress up every year with my kiddos. I haven't decided what I'm going to be this year yet, but I'm working on it....
In honor of Halloween and Fall, I have a few poems, I'd like to share.
An Eyeball in My Garden
By William Shakespeery
Oh dear, oh dear, oh double dear!
It simply cannot be!
Between my roses there's an eyeball
Staring up at me.
What do I do, what can i do?
An eyeball's in my garden.
Will it stink and shrink away,
Or will it sit and harden?
And what if Kitty brings it in?
It might attract the ants.
I guess I could just flip it out
Into my neighbor's plants.
Oh dear, oh dear, oh double dear!
Oh, things are not so fine.
I scooped it up and realized
That lonely eyeball's mine!
Come Closer, Closer...
By Shirley Anne Ramaley
So still, I'm waiting.
Come closer, my dear.
You don't see my web,
But I'm over here.
Do you feel afraid?
You've nothing to fear.
Keep flying this way
Until you are near.
Did you say your prayers?
Well, I'm praying, too.
But what you don't know is
I'm preying for you.
Come closer, closer....
Bedtime Story
By Susie Sawyer
"Please tell me the story," the little one said.
"All right," whispered Grandma, "but then, off to bed.
I lived my whole life in this house, as you know,
But someone else joined me a few months ago.
At first I heard voices and noises downstairs,
Then furniture moving, like tables and chairs.
I think there are four of them; two are quite small.
They roam about freely and pass through the hall.
When I am awake, they make scarcely a peep,
But they cause such a racket when I go to sleep!
I've asked them to leave, yet they don't seem to hear.
It's almost as if they can't see me, my dear.
So I have decided to just let them be;
I stay clear of them, and they stay clear of me.
Now, if you should happen to see one someday,
Do not be afraid and do not run away.
Just mind your own business and don't make a fuss.
They're harmless and not all that different from us.
Remember, my dear, Grandma loves you the most.
Now head off to bed. Be a good little ghost."
Monday, October 13, 2014
Book Trailer Monday...
I saw an interview with this young lady on the Today show talking about what inspired her to write this book and I thought it was definitely one not to miss!
Book Trailer Monday...
Here's an intriguing YA selection...
The sequel Ashen Winter just came out...
The sequel Ashen Winter just came out...
From Our Recipe Box to Yours...
Fancy Mac & Cheese
- Prep Time:
- Cook Time:
- Difficulty:
- Easy
- Servings:
- 12

Ingredients
- 16 ounces, weight White Button Or Cremini Mushrooms, Quartered
- Olive Oil, For Drizzling
- Kosher Salt And Black Pepper To Taste
- 8 slices Thick Cut Bacon
- 2 whole Yellow Onions, Peeled, Halved, And Thinly Sliced
- 5 Tablespoons Butter, Plus More For Buttering The Pan
- 1/2 cup Grated Parmesan Cheese
- 1/2 cup Grated Gruyere Cheese
- 1/2 cup Grated Fontina Cheese
- 4 ounces, weight Goat Cheese (chevre)
- 1-1/2 pound Macaroni
- 1/4 cup All-purpose Flour
- 2 cups Whole Milk
- 1/2 cup Half-and-half
- 2 whole Eggs, Beaten
- 4 ounces, weight Crumbled Gorgonzola Or Other Blue Cheese
Preparation Instructions
Preheat the oven to 425 degrees. Drizzle the mushrooms with olive oil, then sprinkle them with salt and pepper. Roast them in the oven until deep golden brown, 20 to 25 minutes. Set aside.
Next, fry the bacon until chewy but not yet crisp. Chop the bacon into bite-size bits and set aside.
In a large skillet over medium-low heat, saute the onions in 1 tablespoon butter, stirring occasionally, until golden brown, about 15 minutes. Set aside.
Grate the Parmesan, Gruyere, and fontina cheeses. Unwrap the goat cheese.
Cook the macaroni until just undercooked. Drain and set aside.
To make the sauce, melt the remaining 4 tablespoons butter in a large pot over medium heat. Sprinkle in the flour, whisking to combine. Let the roux cook for a minute or so, whisking constantly. Pour in the milk, whisking constantly, then cook the white sauce for 3 to 5 minutes, or until thick and bubbly.
Next, add the half and half, 1 teaspoon of salt, plenty of black pepper, and stir to combine.
Spoon about 1/4 cup of the hot white sauce into a small bowl containing the beaten egg, stirring the egg with a fork as you drizzle it in. Once combined, pour the mixture into the pot with the white sauce, stirring constantly. Add all the cheese in and stir them around to melt.
Add the cooked macaroni and stir to coat. Splash in a little milk or hot water as needed for thinning.
Preheat the oven to 350 degrees. Butter a 9 x 13 inch baking pan generously.
Lay half the cooked onions in the bottom of the pan, followed by half the macaroni, half the roasted mushrooms, half the Gorgonzola, and half the bacon. Repeat the layers, ending with the bacon. Bake for 20 to 25 minutes, or until bubbly and hot. Delicious!
Friday, October 10, 2014
From Our Recipe Box to Yours...
I have it on good authority that this cookie recipe is fabulous!!! Plus it is gluten free!! Seems strange to not add flour, but who cares as long as they taste amazing?!! Give em a try! I'm going to!
 and easy to throw together in a pinch.
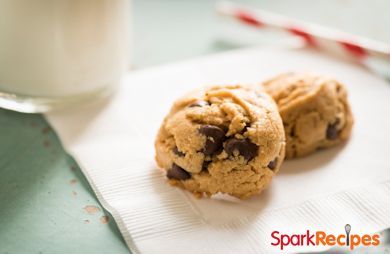
Flourless Peanut Butter Banana Chocolate Chip Cookies
Submitted by: BKATHERINEH Introduction
If there's anything better than the traditional chocolate-peanut butter combo, it's chocolate, peanut butter and banana! These egg-free and dairy-free cookies are dense, flavorful and easy to throw together in a pinch.
Number of Servings: 24
Ingredients
- 1 cup peanut butter
3/4 cup white sugar
1 small-medium very ripe banana, mashed
1 teaspoon baking soda
1/2 teaspoon vanilla
1/2 cup chocolate chips
Directions
1. Preheat oven to 350 degrees F. Mix everything except the chocolate chips in a food processor until well combined. Stir in chocolate chips.
2. Using moistened hands, form generous 1 tablespoon (use more if you want bigger cookies) dough for each cookie into ball. Arrange on 2 ungreased baking sheets, spacing 2 inches apart.
3. Bake cookies until puffed, golden on bottom and still soft to touch in center, about 12 minutes. Cool on sheets 5 minutes. Transfer to racks; cool completely.
Serves: Makes about average sized 24 cookies (12 large cookies)
Preparation time: 15 minutes
2. Using moistened hands, form generous
1 tablespoon (use more if you want bigger cookies) dough for each cookie into ball. Arrange on 2 ungreased baking sheets, spacing 2 inches apart.3. Bake cookies until puffed, golden on bottom and still soft to touch in center, about 12 minutes. Cool on sheets 5 minutes. Transfer to racks; cool completely.
Serves: Makes about average sized 24 cookies (12 large cookies)
Preparation time: 15 minutes
Subscribe to:
Posts (Atom)